
Setting up Mailchimp
- Andrew Stephens

- Dec 23, 2021
- 7 min read
This article will help a member of a Lodge within the jurisdiction of the Grand Lodge of Indiana assigned to the role of "Lodge Marketing & Communications Officer" through the steps of setting up an email marketing tool to communicate with their lodge members. It is recommended that the lodge assigns this brother Assistant Secretary access to the Lodge Portal to enable him to access the personal information required to execute this program.
What is Mailchimp
Mailchimp is an email automation tool that allows the platform manager to send email newsletters, email updates, and other automated messages to members. Lodges will find the most use through sending updates to the lodge calendar, opportunities to volunteer in the community, opportunities to gather together for official lodge visits of one's lodge to other lodges. Those a bit more advanced can even set up "happy birthday" style messages.
Step 1: Secure funding and approval of your lodge to purchase and use this technology.
Review Simple Texting pricing at this link. For most Lodges, the free package will be plenty of capacity. (at the time of writing - free includes up to 2,000 contacts, with 10,000 sends per month and a daily limit of 2,000 emails.)
If you lodge would need a different package, at a business meeting for your lodge during the new business, move to "Allow the Director of Marketing and Communications to use his personal credit card to purchase, be reimbursed for, and begin using Mailchimp to communicate with Lodge members via email. The amount will be (insert annual amount here.)"
Indiana Members - You will have to use your personal card and be reimbursed for your expense as lodges should not have credit/debit cards.
Step 2: Setup your Mailchimp Account at https://login.mailchimp.com/signup/
Create a new login or and enter a password for the account.
Enter your information for the account. This includes your name, your cell number, (note: this will NOT necessarily be the email address they will message from - they just need to ID you.)

After you complete this form, you will receive an email with a verification link that must be clicked. Do this then continue.

You may be presented with a screen to make sure that you are not a robot. Follow the instructions there.
Next, Mailchimp will prompt you to pick your package. You can update later if necessary - it is likely best for a lodge of fewer than 2,000 members to choose "Free."

Enter your and your lodge's information:

You will next have to enter your lodge's mailing address this should be either the physical address or mailing address (including the option for a P.O. Box)

Next, it will ask you if you have a list of contacts. We will review how to export this list from the Indiana Grand Lodge Database in Step 2. If you are outside of INGL, we hope that you have some sort of contacts list available to get you started

You will then be asked what you sell; product or services. For Lodges, pick "Neither" both times, when asked.

On the final screen, pick what types of marketing you wish to receive from MailChimp.
Step 2: Export a Member List (This step is the same for any digital direct marketing tool regardless of which you pick.)
Note: You should re-run this export annually and add new or plural members throughout the year to the Simple Texting tool. Remember, some of the most important members to communicate with are those who just became a member of your Lodge. We must ensure these brothers get off to a good start within the Craft.
Step 3: Import your Member List / Individual Members
Once you have your user list exported, in Mailchimp on the left-hand navigation pane, select "Audience" then "All contacts."

Then, in the body of the page, click on "Add contacts" then select "Import contacts."

Step 1 - Chose the manner in which you will load the contacts. For this example, we will "Upload a file."

Then select "Browse" and find & select the file that contains your member list.


Select "Continue to organize."

Next, you will need to verify that you are allowed to email your contact list. If you are not sending advertising emails, only transactional emails for existing members, you should be OK to set the status as Subscribed and then check "Update any existing contacts." If you are unsure, check the link provided by Mailchimp that gives details on opting-in or with a member of your organization with experience in these circumstances.

Finally, add tags so you can recall specific groups of members to message. If it is your full member roster, we suggest using a tag for the year and a second tag for "member."

In step 2 - you will match (called mapping) relevant columns of data from the database export to their related field in Simple Texting. The only important fields for Simple Text are:
First Name
Last Name (use this field if there is only a "Full Name" field in the source data.
Birthday
Cell Phone Number
Use the left and right arrow buttons on the side of the data table to view all of your information's data fields (columns.)

In our example, the data export did not contain separate "Frist Name" and "Last Name" fields. In this circumstance, we will "Create a new field... " to create a "Complete Name" field by clicking on the "Complete Name" column header from the image above, then selecting "Create a new field..." from the drop-down menu as shown below.

On the next screen, enter the new field's label (tip - if you will be importing information from the same dataset annually, as recommended, use the title of the field/column from the source document.) It is important that you categorize the data type correctly.

These are the data type options from the drop-down on the screen above.

Complete this step for all core data (Name, Email, Cell Phone Number, for future use in conjunction with Simple Texting, and birthdate.)

In step 3 - you will review and complete the load.

Step 4: Download Pre-Made Masonic Email Templates
Now that you have your account set up and have a list of members that you can message, it is time to send an email. set up. To get you off to a quick start, we have created the following templates you can click on to have it dropped in your Mailchimp account file. The links on the left contain Indiana Branded templates appropriate for use within the jurisdiction of the Grand Lodge of Indiana. The second link is for use outside of INGL if your GL allows the use of the Scottish Rite NMJ's Not Just a Man™ Campaign.
It is recommended that you go through and add each one of these to your template library.
Basic Email ( Indiana Freemason Branded | NJAM Branded )

Lending a Helping Hand ( Indiana Freemason Branded | NJAM Branded )

NJAM ( Indiana Freemason Branded | NJAM Branded )

Basic Email ( Indiana Freemason Branded | NJAM Branded )

Part of History ( Indiana Freemason Branded | NJAM Branded )

Mankind ( Indiana Freemason Branded | NJAM Branded )

Step 5: Design & Send an Email (called a Campaign)
In Mailchimp, click on "Campaigns" then "Email Campaigns."

Find the template you wish to base your email on and click on the down chevron next to the template. Click "Create campaign."

A new window will open up and you will be able to begin preparing your email message.
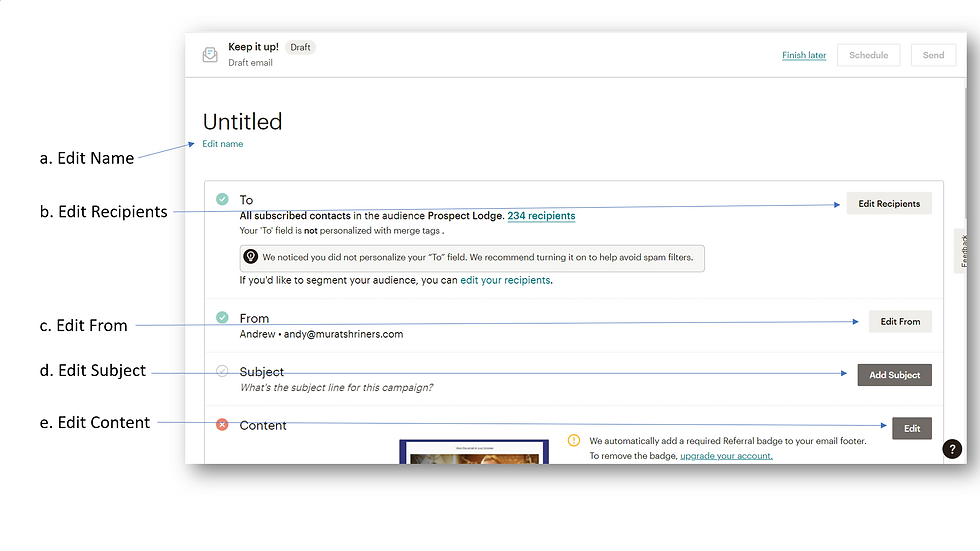
a. Edit Campaign Name. Click on "Edit Name" above (marker a.,) and enter a name for the campaign. We recommend starting the campaign name with the year, month, then day (yyyy_mm_dd) such as 2021_12_23 then a descriptor.
b. Edit Recipients. Ensure that you are sending your email to the correct list. If the previewed descriptor looks correct, continue on. To edit - click "Edit Recipients" and make sure you have the correct audience or segment selected.

c. Edit From. If you wish to change your "From' address or the vanity plate that sits alongside your "From" email address.

d. Edit Subject. Mailchimp provides the following tips on how to write a good subject line:
Try to use no more than 9 word
Try to use no more than 1 emoji - Note: you can find that emoji at emojipedia.com.
Avoid using more than 60 characters
Avoid using more than 3 punctuation marks.
The second field is for "Preview Text." Preview text is the part of your email that appears next to the subject line in recipients’ inboxes. In Mailchimp, you can customize this text or ask us to generate some based on the content of your campaign.
Keep it short - Most email clients limit the amount of preview text shown.
Start with the most important details - If you’re offering breaking news, make sure to include it at the beginning.
Support the subject - If you can’t fit all the important information in the subject line, now is your time to expand on it

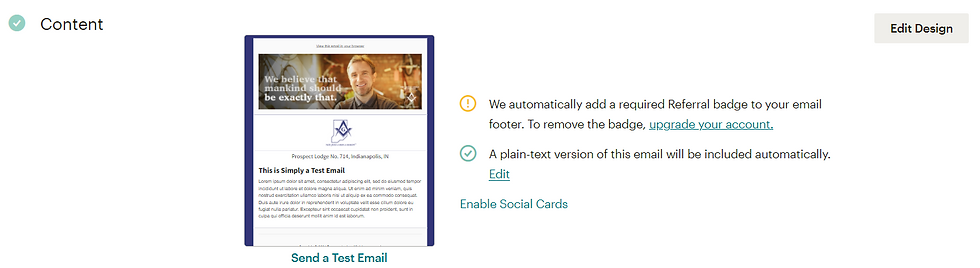
e. Edit Content. Once you click on "Edit Content" you will be taken into the email editor. If you are writing a simple email, make sure to add your lodge name and number by mousing over the placeholder and selecting the pencil icon to edit the text.

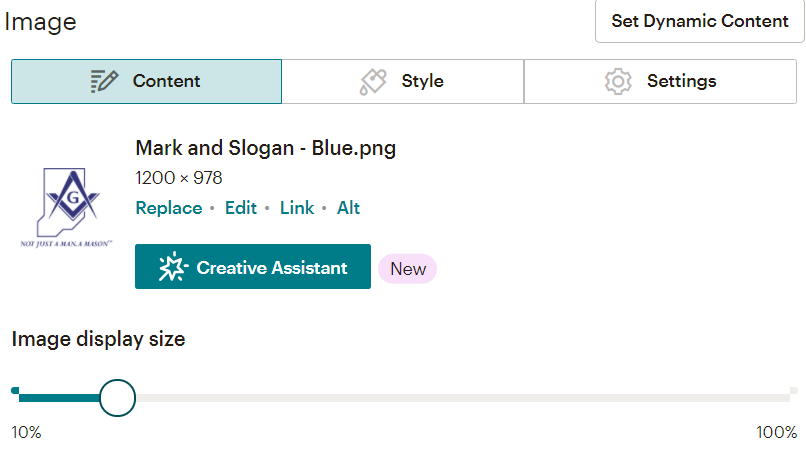
Continue down the template updating the information. You may add new blocks by dragging the placeholders on the right into the space either above or below blocks that already exist in your email. (Image below shows dragging a image block from the right to the left)

To resize an image, click the image and slide the slider at the right.
Once you have finalized your message, click "Continue" at the top right of the webpage.
f. Send a Test Message. Prior to sending your message, always send yourself a test message. You will find a link to send a Test Message on the campaign page under the thumbnail preview for the message. Click "Send a Test Email."
Enter your email address and click "Send Test" and you should receive the email in your inbox within five minutes. It is always a good idea to re-proofread your message and click EACH HYPERLINK to make sure they work prior to sending.

g. Schedule or Send Immediately. Once you are ready to send your message, from the campaign dashboard, select either "Send Immediately" or "Schedule." Scheduling requires a paid subscription.

After you send it, you will be provided with a link that you can use to share your email either with social media users and/or via a text message campaign.
Step 6: Campaign Reporting
From the Campaigns Menu (left-hand navigation,) select the "All Campaigns" then click "View Report" next to the campaign you wish to review. Here you can see the delivery rate, clicks, and the number of opt-outs.

Screenshot showing recipients, etc:
Note: you can click on any of the metrics and see a list of who opened each email and when.

Screenshot showing what links have been clicked and how often: Note: you can click on the "Total clicks" number and it will provide you a list of individuals who have clicked on each list and when.

This concludes this Introduction to Mailchimp. Mailchimp does provide a great set of tutorials for those looking to do more with the program.

Comments